.gif)
My latest creation challenged me to delve into the deepest darkest caverns of my creativity. The order? "A birthday cake that says 'Happy Birthday Mom, Rachel & Bethany.'" That's it, no other instructions. Not flavor, not theme, nothing. I think I lost sleep for 2 nights wracking my brain trying to figure out what on earth to do for this cake. I've only ever made kids' birthday cakes. Not only was this my first adult cake, I had no idea what they wanted! I figured going seasonal was a safe bet, and my Hello, Cupcake! book had instructions on making edible fall leaves. So I gave it a shot...
Step #1 Bake Cake.

Step #2 Gather Fall Leaves, wash them in warm soapy water
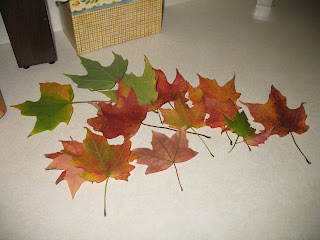
Step #3: Microwave candy melting wafers & mix appropriate colors (one helpful hint I learned the hard way: rather than add blue food coloring to yellow melting wafers to try and get 'the perfect green,' remember that GREEN food coloring is also in your cupboard, and is a much easier way to turn candy green. Duh. It only took me 3 failed attempts mixing in the blue to remember I had green in my cupboard.)
Step #4: Paint melted candy onto leaves, harden in fridge and carefully peel leaves off of candy to create edible leaves.
Step #5: Repeat steps 3 & 4 to remedy broken leaves, until enough salvagable leaves are present with which to decorate the cake.

Step #6: Roll caramels into egg shapes to simulate acorns.


Step #8: Frost cake. Practice basket-weave border.

Step #9: Carefully insert fragile leaves into cake. Place acorns.

Step #8: Carefully pipe LOTS of lettering on the cake, praying everything is spaced correctly and spelled right. (Though it's one of my favorite blogs, I don't want to end up on Cake Wrecks!)
Step #9: Take pictures of the finished product to add to my blog (& my portfolio!)

 Step #10: Recruit husband to help deliver the cake so I can hold it on my lap for the car ride and not worry about it sliding around on the seat. Growl at said husband for each bump he hits on the way there.
 Step #11: Drop it off and breathe a sigh of relief...it's done! And she loved it! Yay!
Step #12: Thank husband for helping deliver, and apologize for growling. All in a day's work. :)

4 comments:
It's beautiful! I love your lettering. And the acorns are cool.
The cake looks great. I love the leaves and the acorns! Great work!!!
LOVE IT! I was just getting ready to write on your other blog and ask about how you made the cool leaves and saw you had directed your readers here...great ideas! Beautiful cake. Sounds like you and the swing lady may become good friends. :)
Christy this is AMAZING! I remember you telling me about painting the leaves, but it's so cool to see it on your cake! Wow, love it!!
Now I'm off to convince my husband to let you make my 25th birthday cake in December *wink*
Post a Comment