Sunday, May 17, 2009

Pupcakes

It's been awhile since I've posted here. Actually, it's been awhile since I've done any cake decorating at all. Unfortunately I had to cancel 3 orders last month due to unexpectedly being put on bedrest during my 8th month of pregnancy. So it's good to be back!

Though I was still technically "bedresting," I was able to put together these cupcakes for my friend Mandi's son's 3rd birthday, with some much-needed assistance from my grandmother! She and my grandpa stayed with me for 2 weeks, helping with cooking, cleaning, and taking care of my daughter. She agreed to help me with this order, and graciously did all of the baking for me, so I could just sit at the kitchen table and decorate...which is my favorite part anyway!

This guy gives new meaning to the name "chocolate" lab, no? :)

The sheepdogs were my personal favorites. I love that you can't even see their eyes!

And the Schnauzers were my second favorite. I had some trouble with my frosting color...tried to color it gray, but as it sat overnight it turned kind of lavendar/purplish. It reminded me of little old ladies with blue-tinted hair. Now I can kind of relate.

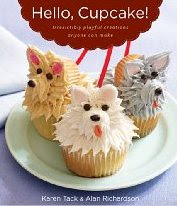
Most of the puppies were fashioned using the instruction of Hello, Cupcake! again, with the exception of 2 "special" puppies that I attempted to fashion after the birthday boy's own dog, Zelda: I wasn't super happy with how these ones in particular turned out, but word has it the kids didn't mind them looking a little bit homemade.

And FYI, if you're ever planning a puppy-themed party, Scooby snacks make for great extra decorations!

Bonus extra credit: look closely at the photographs above, and see if you can find the "special" touch that my ornery husband added to one of the cupcakes. He thought it was hilarious....and apparently so did the little boys at the birthday party.

All photos courtesy of Mandi Morgan Photography. Thank you for making my work look so good!

Thursday, March 12, 2009

Butterfly How-To

I used to take detailed step-by-step process pictures as I was decorating cakes and cupcakes, then post a big long narrative about how it was all done. This is the first time I didn't do that. I didn't think anyone really cared, and I don't want this blog to be boring! And this time I got questions about how I made the butterfly wings. And I'm thrilled to share with you all! (I'm just sorry I don't have any pictures of the process to share.)

Unfortunately I can't claim this particular idea as my own. I followed the instructions for Monarch wings as detailed in the book Hello, Cupcake! by Alan Richardson and Karen Tack.
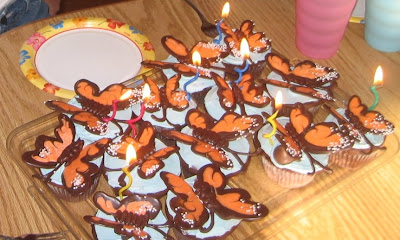
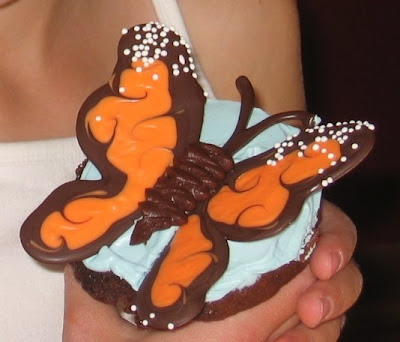
I made a few changes to accommodate the requests of my customer; she asked for more "girly" colors. So instead of using dark melting chocolate and orange melting candy, I used almond bark and food coloring. The problem I discovered with the almond bark was that it dried really fast, and made it difficult to work with.

The basic process includes printing off a wing template and placing it underneath waxed paper, then outlining the template with one color of melted candy. Next you fill in the outline with another color candy, and then (quickly! before they dry!) use a toothpick to drag the outer color into the inner color. While the candy is still wet you can sprinkle non-pareils onto the wings, if you so desire. My initial mistake was to outline 3 sets of wings, then fill in 3 sets of wings, then try to drag in the colors. By the time I got back to the first set of wings, the candy was completely dry. I had to stick the butterflies in the oven to try and re-melt them, and it just wasn't a very smooth process. The second try went much better, working butterfly by butterfly. Eventually I ran out of almond bark and used some Baker's dark chocolate melting wafers, and they worked SO MUCH BETTER than the almond bark! The chocolate didn't harden nearly as fast. (I also made the antenna by simply tracing a template onto waxed paper and letting them harden.)
After the wings are made, and hardened, place them on the cupcake, propped up with a piece of candy such as an M&M, (I just piped some frosting and that did the same trick,) place the antennae, then pipe a frosting body down the middle.

That's it! It really wasn't too complicated, once I figured out how to do it right. And the best part was, the wings could be made ahead of time, so I didn't have to do the entire project in one day. ESSENTIAL when you have an 18-month-old in the house! :)

My sister-in-law inspired me to buy this book, and eventually try these cupcakes, after making them a last year for my niece's birthday. Don't they look great!?!? Thanks, Laura!

Friday, March 6, 2009

Spring is in the air!

It was so fun to do this most recent cupcake order, especially with the recent change in weather! A sweet little girl is turning 3, and requested "flowers, butterflies, or princesses," for her birthday; I was able to fulfill 2 of 3 requests for her.
Take a look at my new "professional" packaging!

Welcome!

Welcome to my new address. This site should be undergoing some significant cosmetic changes in the near future, but for now it will work.

Please visit my old site for more history about who I am and how I got started, as well as pricing information, etc.

Thank you for your patience while I am "under construction!"

Sunday, February 8, 2009

Happy Valentine's Day

I am in awe of this cake. Someday...when I have lots of free time...I'm going to attempt to make these. Someday.

Saturday, February 7, 2009

Edible Presents

My latest cake was one of the simplest design concepts I've tackled so far...or so I thought. It ended up being one of the most difficult cakes I've made so far. Probably had something to do with the double-decker design. I was going to attempt to cover the entire thing with fondant, but after reading lots of reviews on the recipe I had found, and hearing "takes practice" over and over again, I decided not to risk it. This was my brother-in-law's 35th birthday, after all! I wasn't thrilled with the end product, but my husband mistook the cake for an actual package on the table, so I figured that's a decent start.

Tuesday, January 27, 2009

Chocolate Macaroon Tunnel Cake

Last week I was craving something with chocolate and coconut. So I did a search on my favorite cooking website, and came up with this recipe.
Since I don't have a regular bundt cake pan, I decided to use my individual bundt/muffin pan to make mini-chocolate cakes. And this was the final creation:

Check out that delicious layer of coconut goodness hiding inside!

If I were to make this again, I would definitely double, or triple, the ingredients for the coconut filling, because it could use more. But the cake itself was delicious! And my chocolate coconut craving was satisfied...for awhile.