Sunday, May 17, 2009

Pupcakes

It's been awhile since I've posted here. Actually, it's been awhile since I've done any cake decorating at all. Unfortunately I had to cancel 3 orders last month due to unexpectedly being put on bedrest during my 8th month of pregnancy. So it's good to be back!

Though I was still technically "bedresting," I was able to put together these cupcakes for my friend Mandi's son's 3rd birthday, with some much-needed assistance from my grandmother! She and my grandpa stayed with me for 2 weeks, helping with cooking, cleaning, and taking care of my daughter. She agreed to help me with this order, and graciously did all of the baking for me, so I could just sit at the kitchen table and decorate...which is my favorite part anyway!

This guy gives new meaning to the name "chocolate" lab, no? :)

The sheepdogs were my personal favorites. I love that you can't even see their eyes!

And the Schnauzers were my second favorite. I had some trouble with my frosting color...tried to color it gray, but as it sat overnight it turned kind of lavendar/purplish. It reminded me of little old ladies with blue-tinted hair. Now I can kind of relate.

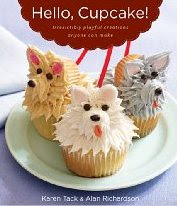
Most of the puppies were fashioned using the instruction of Hello, Cupcake! again, with the exception of 2 "special" puppies that I attempted to fashion after the birthday boy's own dog, Zelda: I wasn't super happy with how these ones in particular turned out, but word has it the kids didn't mind them looking a little bit homemade.

And FYI, if you're ever planning a puppy-themed party, Scooby snacks make for great extra decorations!

Bonus extra credit: look closely at the photographs above, and see if you can find the "special" touch that my ornery husband added to one of the cupcakes. He thought it was hilarious....and apparently so did the little boys at the birthday party.

All photos courtesy of Mandi Morgan Photography. Thank you for making my work look so good!

Thursday, March 12, 2009

Butterfly How-To

I used to take detailed step-by-step process pictures as I was decorating cakes and cupcakes, then post a big long narrative about how it was all done. This is the first time I didn't do that. I didn't think anyone really cared, and I don't want this blog to be boring! And this time I got questions about how I made the butterfly wings. And I'm thrilled to share with you all! (I'm just sorry I don't have any pictures of the process to share.)

Unfortunately I can't claim this particular idea as my own. I followed the instructions for Monarch wings as detailed in the book Hello, Cupcake! by Alan Richardson and Karen Tack.
I made a few changes to accommodate the requests of my customer; she asked for more "girly" colors. So instead of using dark melting chocolate and orange melting candy, I used almond bark and food coloring. The problem I discovered with the almond bark was that it dried really fast, and made it difficult to work with.
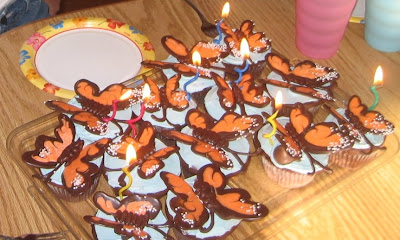
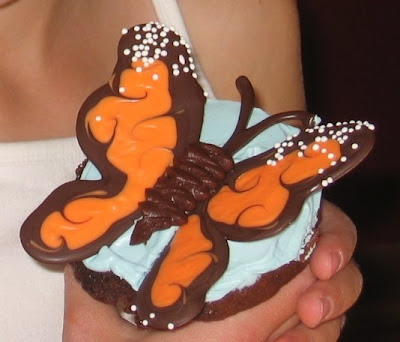
The basic process includes printing off a wing template and placing it underneath waxed paper, then outlining the template with one color of melted candy. Next you fill in the outline with another color candy, and then (quickly! before they dry!) use a toothpick to drag the outer color into the inner color. While the candy is still wet you can sprinkle non-pareils onto the wings, if you so desire. My initial mistake was to outline 3 sets of wings, then fill in 3 sets of wings, then try to drag in the colors. By the time I got back to the first set of wings, the candy was completely dry. I had to stick the butterflies in the oven to try and re-melt them, and it just wasn't a very smooth process. The second try went much better, working butterfly by butterfly. Eventually I ran out of almond bark and used some Baker's dark chocolate melting wafers, and they worked SO MUCH BETTER than the almond bark! The chocolate didn't harden nearly as fast. (I also made the antenna by simply tracing a template onto waxed paper and letting them harden.)
After the wings are made, and hardened, place them on the cupcake, propped up with a piece of candy such as an M&M, (I just piped some frosting and that did the same trick,) place the antennae, then pipe a frosting body down the middle.

That's it! It really wasn't too complicated, once I figured out how to do it right. And the best part was, the wings could be made ahead of time, so I didn't have to do the entire project in one day. ESSENTIAL when you have an 18-month-old in the house! :)

My sister-in-law inspired me to buy this book, and eventually try these cupcakes, after making them a last year for my niece's birthday. Don't they look great!?!? Thanks, Laura!

Friday, March 6, 2009

Spring is in the air!

It was so fun to do this most recent cupcake order, especially with the recent change in weather! A sweet little girl is turning 3, and requested "flowers, butterflies, or princesses," for her birthday; I was able to fulfill 2 of 3 requests for her.
Take a look at my new "professional" packaging!

Welcome!

Welcome to my new address. This site should be undergoing some significant cosmetic changes in the near future, but for now it will work.

Please visit my old site for more history about who I am and how I got started, as well as pricing information, etc.

Thank you for your patience while I am "under construction!"

Sunday, February 8, 2009

Happy Valentine's Day

I am in awe of this cake. Someday...when I have lots of free time...I'm going to attempt to make these. Someday.

Saturday, February 7, 2009

Edible Presents

My latest cake was one of the simplest design concepts I've tackled so far...or so I thought. It ended up being one of the most difficult cakes I've made so far. Probably had something to do with the double-decker design. I was going to attempt to cover the entire thing with fondant, but after reading lots of reviews on the recipe I had found, and hearing "takes practice" over and over again, I decided not to risk it. This was my brother-in-law's 35th birthday, after all! I wasn't thrilled with the end product, but my husband mistook the cake for an actual package on the table, so I figured that's a decent start.

Tuesday, January 27, 2009

Chocolate Macaroon Tunnel Cake

Last week I was craving something with chocolate and coconut. So I did a search on my favorite cooking website, and came up with this recipe.
Since I don't have a regular bundt cake pan, I decided to use my individual bundt/muffin pan to make mini-chocolate cakes. And this was the final creation:

Check out that delicious layer of coconut goodness hiding inside!

If I were to make this again, I would definitely double, or triple, the ingredients for the coconut filling, because it could use more. But the cake itself was delicious! And my chocolate coconut craving was satisfied...for awhile.

Thursday, January 22, 2009

Teddy Bear Fame

Okay, one more link to the teddy bears. I was thrilled today to hear that a link to my teddy bear cupcakes appeared on Cakespy.com. I just heard about this website recently, and apparently it's kind of a big deal. (Bigger than my little blog, at least.) It's not every day that an illustrator for Taste of Home, who's based in Seattle, takes note of some cupcakes made by a stay-at-home-mom in Iowa!! Click on the Cakespy link above and scroll down a bit to see where she mentions the bears.

Monday, January 19, 2009

Teddy Bear: Say Cheese!

For more (professional) pictures of the Teddy Bear cupcakes, visit:

http://hillmancrew.blogspot.com/2009/01/teddy-bear-cupcake-army.html

And to see them in all their destruction glory, check out little Jack:

http://hillmancrew.blogspot.com/2009/01/destruction-of-teddy-bear-army.html

Cupcakes never look better than when smeared on the face of a 1-year-old, no? :)

Sunday, January 11, 2009

Teddy Bear Assembly Line

I dreamed about teddy bear cupcakes last night. Seriously. Probably because I decorated teddy bear cupcakes yesterday...over and over and over again. I always forget how much more work cupcake decorating is than cake decorating. Just when you finish, you realize that it was just the first one, and there's 11 more to do!

This is what cake-decorating does to my kitchen...


Actually this was probably my easiest cake order yet. These teddy bears turned out cuter than I expected, and once I got my method down, each one got easier and the work went a little bit faster. My total hands-on time was just 2 hours...my fastest decorating time yet!
This particular order was for a cute little 1-year-old's birthday. (If you click on that link and scroll down a bit, you'll see sweet Jack. My friend Mandi took his photo awhile back, and she passed my cake-biz info along to his mom. Thanks, Mandi!) Anyways, Jack's mama requested teddy bear cupcakes, and neither one of us could find an example of them anywhere. The closest I could come up with were the Panda Bear cupcakes in my "Hello, Cupcake!" book:


So I used these pandas as a rough template/idea springboard, and this is what I came up with:

(Mama couldn't decide if she wanted just teddy bear faces, or teddy bears with bodies, so she asked for a half dozen of each.)
Here are the fellas all packaged up and ready to go on a (stressful!) ride across town. I was afraid their heads might slide off during the drive. Thankfully, no casualties!

Thursday, November 6, 2008

Palatable Penguins

Recently my sister-in-law enlisted my help, (okay, maybe I talked her into it in the first place,) making penguin cupcakes for her daughter's 4th birthday. "Happy Feet" was the theme, and these penguin cupcakes seemed like they would be perfect! As always, the project took much longer than anticipated, (as is usually the case with 5 children underfoot,) but I think you'll agree that the finished project was worth the effort. We had a few minor casualties (heads detaching from bodies during the chocolate dipping process, multiple attempts with different materials to try and create not-too-scary-looking eyeballs, and one penguin in particular who frankly just looked like he needed some good rehab. Anyone know a good physical therapist for penguins?) But thankfully enough penguins survived to provide a welcome feast at the birthday party. Without further ado...

Mmmmm...cupcake...frosting...chocolate donut...frosting...donut hole. It doesn't get much better than that.

More frosting.


Dunk in melted chocolate frosting; add marshmallow belly slice, Starburst beak, and cookie wafer arms.

Kick yourself for not baking them in paper baking cups. Poor melty-looking bodies!


And finally, the finished product.

They looked better with paper baking cups added at the end. And eyeballs. :)

Saturday, November 1, 2008

Take it or Leaf it

My latest creation challenged me to delve into the deepest darkest caverns of my creativity. The order? "A birthday cake that says 'Happy Birthday Mom, Rachel & Bethany.'" That's it, no other instructions. Not flavor, not theme, nothing. I think I lost sleep for 2 nights wracking my brain trying to figure out what on earth to do for this cake. I've only ever made kids' birthday cakes. Not only was this my first adult cake, I had no idea what they wanted! I figured going seasonal was a safe bet, and my Hello, Cupcake! book had instructions on making edible fall leaves. So I gave it a shot...

Step #1 Bake Cake.


Step #2 Gather Fall Leaves, wash them in warm soapy water

Step #3: Microwave candy melting wafers & mix appropriate colors (one helpful hint I learned the hard way: rather than add blue food coloring to yellow melting wafers to try and get 'the perfect green,' remember that GREEN food coloring is also in your cupboard, and is a much easier way to turn candy green. Duh. It only took me 3 failed attempts mixing in the blue to remember I had green in my cupboard.)

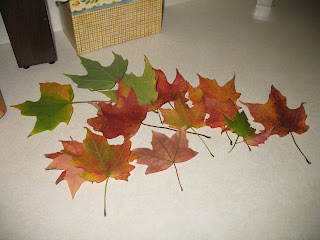
Step #4: Paint melted candy onto leaves, harden in fridge and carefully peel leaves off of candy to create edible leaves.
Step #5: Repeat steps 3 & 4 to remedy broken leaves, until enough salvagable leaves are present with which to decorate the cake.

Step #6: Roll caramels into egg shapes to simulate acorns.

Step #7: Dip 'acorns' into melted chocolate frosting & chocolate sprinkles.

Step #8: Frost cake. Practice basket-weave border.

Step #9: Carefully insert fragile leaves into cake. Place acorns.

Step #8: Carefully pipe LOTS of lettering on the cake, praying everything is spaced correctly and spelled right. (Though it's one of my favorite blogs, I don't want to end up on Cake Wrecks!)

Step #9: Take pictures of the finished product to add to my blog (& my portfolio!)


Step #10: Recruit husband to help deliver the cake so I can hold it on my lap for the car ride and not worry about it sliding around on the seat. Growl at said husband for each bump he hits on the way there.
Step #11: Drop it off and breathe a sigh of relief...it's done! And she loved it! Yay!
Step #12: Thank husband for helping deliver, and apologize for growling. All in a day's work. :)

Saturday, September 20, 2008

A Little Background

About me:

I'm fairly new to cake decorating, but am at the point in my life where I want to make it more than just a hobby. (Or at least try to make it a semi-lucrative hobby.) :) "Officially" I'm a physical therapist, but since having my sweet baby girl just over a year ago, I've transitioned to being a work-at-home mom, and I wouldn't have it any other way. Currently I work (very) part-time, mostly just to maintain my professional credentials, (and slowly shrink those pesky student loans!) But recently I decided it would be nice to have a way to earn some extra cash while working from home. And to have a creative outlet! Thus...the idea for Sweets 'n Stuff was born. I've made cakes for my nieces, my own daughter, and friends, and now I'm ready to expand. It seems my 'specialty,' if you can even call it that, has so far been kids' birthday cakes.

My designs:

I'm willing to try any Wilton designs you send my way; if I need to purchase a special pan, a small fee will be added to my regular charge, or you can purchase the pan yourself and simply loan it to me. I can also reproduce an image of a favorite character or design on top of a cake, as long as it's not too complicated. The most challenging image I've done so far is Shrek. My new favorite sweets book is Hello, Cupcake! I recently purchased this book and am just itching to try out these adorable cupcake designs. Feel free to check out this book from the public library, or browse through it the next time you're at Borders or Barnes & Noble, and let me know which cute creation you'd like me to make for your next occasion! Personally I'm looking forward to making the pumpkin cupcakes this Halloween. You can view photos of some of the cakes I've done in my Picasa web album, which has a link on the tool bar to the right.

Details:

I need at least one weeks' notice for any orders, but 2 would be preferable so I have plenty of time to gather supplies. For moms (or dads) on a budget, if you'd prefer to bake your own goods and bring them to me to simply decorate, I'm willing to do that as well, for a discounted price. Price per cake will be at my discretion, based on the complexity of the design, my estimated cost and hours to make, and will be quoted up front. I'm hoping to keep them in a range of $20-40 for an average birthday cake. So....if you're interested, leave a comment and I'd love to do business with you!